|
Before
you start:
1) Important! Backup your baseq2/config.cfg to a save location
as KeyGrip may make changes to the binds.
2) Check your config.cfg by opening it in wordpad (or any other
texteditor) and find the "gl_mode" command and set
it to "gl_mode 1" (400x300) or "2" (512x384).
(The reason for changing the video mode before starting KeyGrip
is when you change the game's video mode (resolution) from within
the 3D-window in KeyGrip, it can result in dialogue windows
jumping out of view and/or disappearing when trying to activate
them, which makes it impossible to do any editing.)
Loading your demo
If you start KeyGrip for the first time go to: File > Preferences:
"OpenGL mode resolution": 400x300 (if you have one monitor
it's best to use a small 3D-window).
 Open your demo in KeyGrip Open your demo in KeyGrip
 and nevermind the
blank filmstrip. If you see this message: "Multi-Level
demo detected. Would you like to save the additional levels?"
just choose "No". and nevermind the
blank filmstrip. If you see this message: "Multi-Level
demo detected. Would you like to save the additional levels?"
just choose "No".
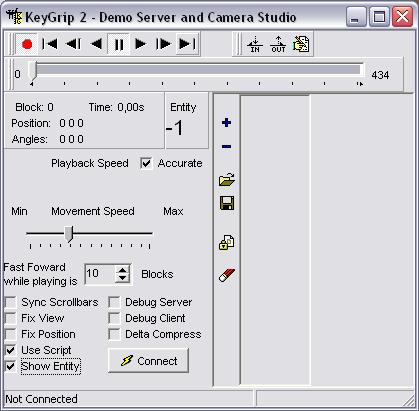
Connecting to your demo
On the menubar press
the 'Show Demo Server' button  and in the dialogue (shown below) press the 'Connect' button.
Quake2 will start in gl_mode 1 (400x300) and pauses the demo at
the first block.
and in the dialogue (shown below) press the 'Connect' button.
Quake2 will start in gl_mode 1 (400x300) and pauses the demo at
the first block.
(The 3D Preview window is actually Quake2 running in Windowed
mode. So in order to customize the camera controls, hit Escape
and go to "options" -> "customize controls"
and make sure the following keys are bound: turn left, turn
right, look up, look down, center view, up, down).
Finding the entity
number
Now that KeyGrip is connected to your demo you'll see the demo
paused at the first block. Keep it paused.
Click the 'Show
Demo Server' button
and then uncheck the "Fix view" and "Fix
position" boxes and check the "Show Entity"
box.
Every entity on the map has its own number;
the items, the weapons, the projectiles and the other players. The most important step here is to find the unique entity
number of the player you were chasing.
Time to enter the matrix.
Since you have unchecked the two "Fix..."
boxes, the original chase camera is unlocked and you'll be able
to move the camera away from the recorded player, using the movement keys
that you bound earlier.
If you lose track of the playermodel you can reset the "fix position" to lock the cam back onto the player.
In the 3D window use
your movementkeys to aim the crosshair at the recorded player
so its unique entity number will be displayed in the dialogue
window (there where it says -1 in the attached image).
If the number doesn't change when looking straight at the player,
try some different angles and of course don't forget checking
the "Show Entity" checkbox.
(It's best to double check the entity number by checking the two
"Fix..." boxes again and letting the demo play
for a while. Then pause it and repeat the same steps to check
the entity number of your recorded player. If it's the same as
before it's save to go on.)
Adding the 1st Person camera
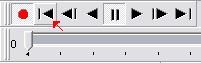
First rewind the
demo by pressing the "Go to first block" button
Check the two "Fix..."
boxes again so the camera is glued to the player again.
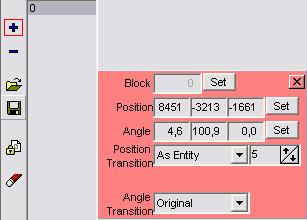
Let's say the number
of the recorded player is "5". In the 'Show Demo
Server' dialogue you will see a blue "+" and a "-".
The plus will let you add a new camera.
Click the plus and set "Position Transition"
to "As Entity, #5" (which is the entity number
you found earlier) and "Angle Transition" to
"Original".
If you did everything right you'll now see that the Field Of View
(FOV) -camera is placed inside the recorded player's body.
At this point you're done with the actual 'recamming', but continue
with the last step to clean up the partly visible player model
and weapon. But first save the demo as uncompressed .kg2
file, in case something messes up. (Don't worry about savelog
warnings). If at any time the "Show Demo Server" window
disappears, just click the button again.
Removing
the player's model and weapon from the demo
First rewind the
demo by pressing the "Go to first block" button
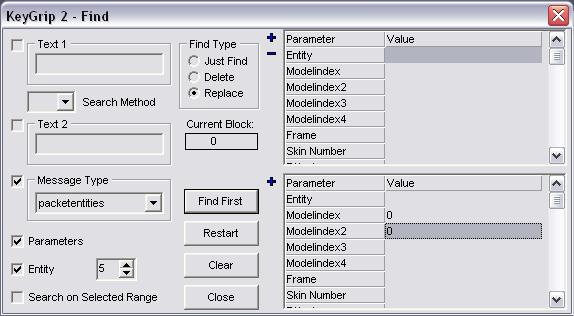
Then press the Find-button
 on the menubar and...: on the menubar and...:
...set the "Find Type" to "Replace".
...check the "Message Type" checkbox and set it to "packetentities"
...check the "parameters" checkbox
...check the "Entity" checkbox and set it to number
"5" (or whatever the number of the recorded player is)
In the bottom right
field (where there's only a "+") enter a value of "0"
after "Modelindex" and "Modelindex2".
It should look like this:
Now click on "Find
First" and then apply to "All". Close the window
when done.
Again click the
and check the demo by letting it play. You should now have retrieved
the 1st person view.
Note: the
new FOV will appear lower than usual as if the player is crouching.
This will only be visible while playing the demo in KeyGrip, it
is NOT in the actual demo!!
Save the file as uncompressed
.kg2 file first (preferably under a new name)
Then save as compressed
.dm2 file.
When
you're done with the editing don't forget to move (and temporarily
rename) the current, altered config.cfg out of your baseq2 directory
and put back your original config.
There
is some brief documentation on this subject somewhere else but
from what I remember it wasn't very clear on how to get back to
1st Person View. Also I believe it never hurts to add a few simple
pictures and step by step instructions. |
