| Quake2 weapon model (vertex) animation |
|---|
Import/Export
If you've made a custom weapon model in MilkShape3D for example and you'd also like to see players carrying it ingame, instead of the standard weapons, you'll need to *animate and convert it to the .md2 format. Here's a way of doing it.
MilkShape has an Export to .md2 but some say it's flawed and never been made fully functional. To export models to .md2, the old Q2Modeler is still the best pick for the job. It's compatible with .3ds (Autodesk 3dsmax) and .lwo (Lightwave object) and since MilkShape can export both it's up to you which format you use.
*It's worth mentioning that making the UV-skinmesh before doing the animation is no use, because Q2Modeler only lets you import a model as raw vertex information, which discards any skin coordinates. To skin an animated .md2 model you'll need the to use the in-built skin editor from Q2Modeler or something like Npherno's Skin tool. Both of them are quirky tools but should get the job done. Luckily the skin painting itself you can do with better tools like Gimp or Photoshop.
In this example I used Lightwave .lwo format, as a non-animated model with one frame. (For some reason on import Q2Modeler rotates the model -90 degrees on X, so I just rotate it first in MilkShape as it lets you use numbers. Select all. Rotate > Center of mass > X: 90 degrees. Then export.)
So the sequence would be:
MilkShape: File > Export -> yourmodel.lwo (or .3ds)
Q2Modeler: File > Import -> Import Append Verts... yourmodel.lwo
Q2Modeler: File > Export -> yourmodel.md2 (it asks you to pick a .pcx skin, this path will get stored)
If you ever need to Import a stock .md2 model into MilkShape, you can pick which frame to import, as it'll only import one frame of the animation.
In MilkShape under "File-> Preferences: Misc" you can set an Import frame (default 0).
Q2Modeler
The goal is to make your own weapon follow the movement of a standard weapon. As a guidance for the weapon animation, you'll need to load up a w_*.md2 weapon model. (!)Backup these weapon .md2's first before messing around. They can be found in the default folders of the baseq2/players directory, eg. in players/male/
Load up Q2Modeler and go to File-> Open... and browse to one of the default weapons, like w_rlauncher.md2. Ignore the couldn't load pcx skin warning. Keep it at frame0.
Set the 3d viewport to flatshaded (Options>3dview->flatshaded or ctrl+2) so you'll get a better view on the position. Pressing (P) will let you pan the camviews. Hold rightclick to zoom. (A) to select all, (/) to deselect all.
Unfortunately Q2Modeler doesn't support grouping. This next step isn't necessary but what I normally used to do was add a new temp frame, just for selection purposes. This frame has to be deleted before exporting the model.
 |
|---|
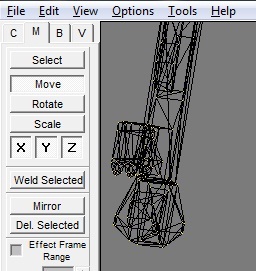 |
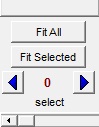
Next, select all verts (A) and make sure you're in the M-panel tab (<-pic) and the X, Y, Z buttons are all activated. Move the original weapon out of the way so that once you import your own weapon, you can easily select it without selecting parts of the original model.
---
|
|---|
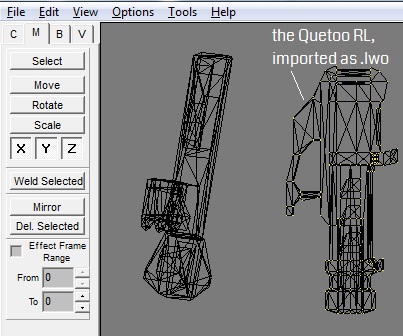 |
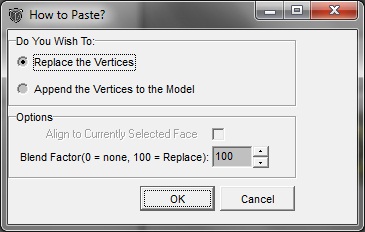
Now Import your own weapon. Go to File-> Import-> Import Append Verts... yourownweapon.lwo (don't worry about the position yet.)
If it needs to be rescaled a bit, better do it now. On the M-panel tab (see <-pic), check the "Effect Frame Range" tickbox and put in from 0 to 173. Rescale your weapon and uncheck the box!)
Now on the V-panel tab click "Hide Unsel" so that the verts of the original weapon can't be touched. This is good because now you can freely select your own weapon and modify its postion according to the frames. Keep all verts of your weapon selected at all times. |
|---|
Now for the "animation" part
At this point your own weapon model will sit still while the original weapon will dance around the soon as you press (+) and (-) to cycle through the frames. I don't know if you've ever made a gif animation or a flipblook, but it's kind of like the same process.
If you added the extra "selection" frame, start at frame1 (which technically is the real frame0) and with just your own weapon verts selected, use the Move & Rotate buttons and the 3 wireframe viewports to position it so it matches the original weapon's angles.
Luckily the positioning doesn't have to be too precise, for once it animates ingame you won't notice small imperfections. Most models have parts that stick inside of each other anyway.
Before positioning :( 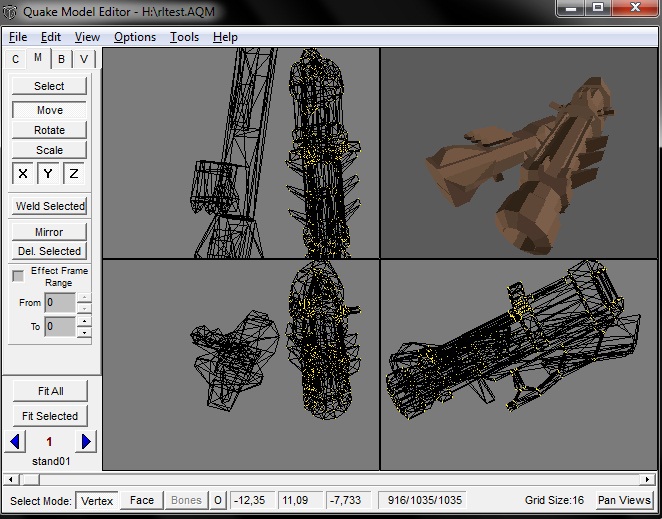 |
After positioning :)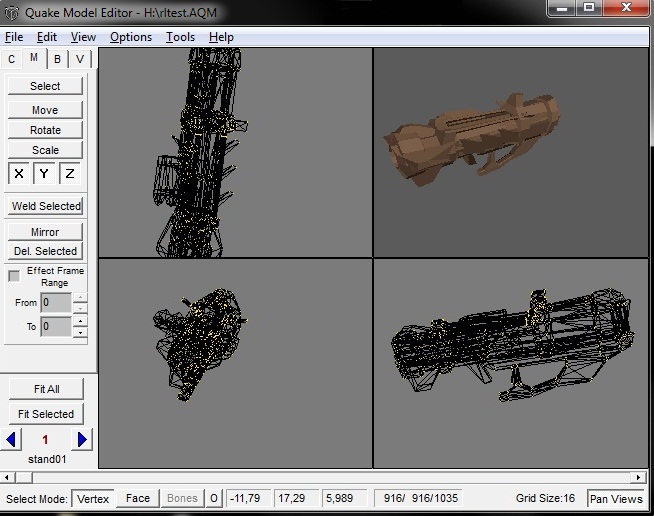 |
|---|
Once your weapon is more or less in the same position and angle as the original weapon, press Ctrl+C to copy and then (+) to move to frame2. *Switching back and forth between the previous and current frame with (+) and (-) makes it easier to see which way your weapon needs to rotate/move. |
 |
Cleaning up
- The last two steps would be to get rid of your "select" frame (frame0) so make sure you're in that frame. Go to Edit-> Delete current frame. There's no undo for this.
- Then switch to the V-panel tab and click "Unhide all", then go to Select-> select invers (i). The original weapon will get selected. Now delete it (del) so you're left with just your own weapon.
Note:
Before exporting anything to .md2, make a new folder called "models" somewhere in the root of one of your Drives, eg. F:\models
Open baseq2\pak0.pak and browse to models, copy the whole weapons folder and dump it in your new F:\models dir, so you'll get F:\models\weapons\
(It's just the g_ folders you need, the rest you can delete.)
When you're exporting your model to .md2 you're asked to pick a .pcx file. Browse to the skin for the weapon you're replacing, in this case; models\weapons\g_rocket\skin.pcx
This path will be stored in the .md2 file and Q2 can't find your skin if this path is any different.
| --- |
|---|