Hint Brushes De-Mystified
(for at least Quake 2)
by Joel "Death Mongrel" Caesar
Copyright © 1998 Joel Caesar
----------------------------------
This document
may be freely distributed and served provided:
1. If served as an archive, it remains in its original unmodified form.
2. If placed in a website, the text and images remain unmodified. The format
(HTML tags) may be changed to conform to the visual look of the site it is displayed
in.
Note:
in order to accurately determine whether or not you need
a hint brush in a specific place, you really need the gl_showtris option set
to 1, and a full OpenGL implementation on your system. If you have a full OpenGL
card and nothing happens when setting the gl_showtris to 1, then you just need
to make sure that gl_ext_multitexture is set to "0" in your config.cfg-file.
Why this tutorial?
Even with the
recent .plan file posting from PlanetQuake's QuakeFinger server detailing how
to use hint brushes, many people still find them difficult to understand. I
therefore offer this "Tutorial" to help you learn how, where, when,
and why to use them.
The difficulty
in learning how to use hint brushes is complicated, mainly because one has to
know how the bsp and vis utilities (or QBSP/QVIS) actually work. I may not be
100% correct here, but in some test maps, the effects desired were achieved
by placing the hint brush according to the steps which will follow below.
Knowing how bsp
works is the most important aspect of using hint brushes. Learning how bsp builds
triangles out of your brushes can really only be done well if you have a FULL
OpenGL implementation on your build machine. If you do, you can use "gl_showtris
1" in the console to have the Quake2 engine display the triangles. Unfortunately
3Dfx boards don't allow this. FireGL1000Pro's from Diamond work nicely, and
are a decent 3D accel. for NT (Not as smooth as 3Dfx in games like GLQuake1/2).
The FireGL1000Pro also doesn't show colored lighting (if they do, I'd like to
know how to turn that on).
All of the figures
below will be shown from the top-down view only.
(Please note that
bsp will often be more complicated in building triangles out of your brushes,
and my example was drawn to keep it "clean" and understandable).
 |
1.
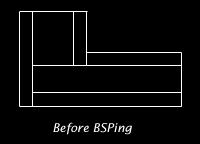
Part of the map
Here is
an example hallway between two areas (shown in later examples). Again,
shown from the top-down view.
|
 |
1.
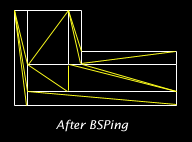
Understanding BSP created triangles
When you
run BSP (or QBSP3) the program goes through each brush and slices it into
triangles. Some people refer to the triangles as polygons. I will use
the term triangles, because that should remind you that, to my knowledge,
Quake doesn't use 4-point polygons.
Here you
can see the brushes (at least as far as top-down view is concerned) have
been divided into triangles as shown by the yellow lines.
|
 |
2.
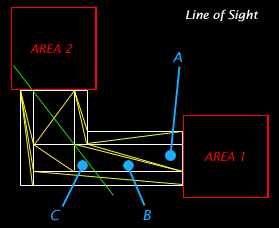
Understanding how VIS determines what to draw
Here you
can see we've added two areas in red, representing either more hallways,
rooms, or any "container" in which the player can go or see.
Notice the
green line of sight line (LOS) that I've drawn. It indicates how far you
can see into the hallway and around its corner from Area
2.
Now say
your player is at Point A. Since
he is not past the green line, the Quake engine will not draw triangles
of and within Area 2. Now say your player moves to Point
B. Suddenly, the Quake engine will draw area 2--and you're
still behind the LOS line!
The reason?
Point C, which is on the SAME triangle
as Point B, can see into Area
2. When VIS determines what can and can't be seen from a single
triangle, it uses the vertexes (I assume ;).
|
 |
3.
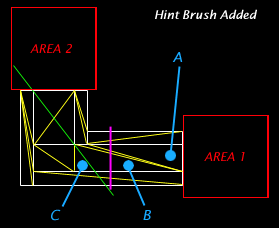
What a hint brush is and how to place it
A hint brush,
is a brush with the hint texture applied to all sides. Typically you make
it as small as is manageable (about 8 units thick) and large enough to
slice through the area you need to "split."
As shown
in the diagram, the hint brush (in pink, or fuscia if you will), completely
slices through the section of hallway. DO
NOT USE CSG!!! You will create a leak if you do. The hint
brush is not rendered, and is only used by VIS (more on that in part 4).
In this
example, the hint brush has been placed almost to the line of sight and
extends into the void through the hallway.
|
 |
4.
What the hint brush does
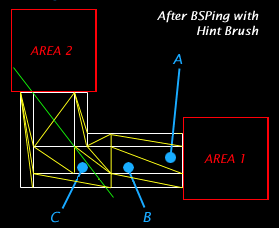
The hint
brush forces QBSP to "break" brush triangles at the indicated
points (see diagram), creating more triangles VIS can use to calculate
with.
Now, when
the player is at Point A or B, Area
2 is NOT drawn. When the player is at Point
C, Area 2 IS drawn.
Notice how in example 2, Area 2
is drawn for 50 percent of the hallway. The triangle in example 4, under
Point C, is now about 25 percent
as large as it was previously.
What this
means is, you've added maybe 10-20 triangles but 80 percent of the hallway
doesn't draw Area 2, saving you even more triangles
from Area 2 being drawn.
|
Final Notes:
You need to be
careful adding hint brushes. If BSP had created triangles as in example 4, then
you don't need to add a hint brush. The "break" is already there.
Adding the hint brush in this case would simply increase the total number of
triangles in the hallway, completely defeating it's purpose.
---


