| One of the coolest things in
quake2 are the environment maps. The only problem is that there
is not a great variety of them in quake2. They are unit1_
through unit9_ and space1. The unit maps are all
of the alien world backgrounds and space is the one used on the
last few levels. to view these in a map just type sky name
of sky at the console.
What if you dont like any of the quake2 environment maps? Well make your own. This is what i will attempt to show you how to do. Its not very easy though.
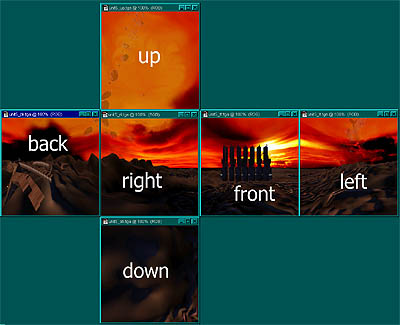
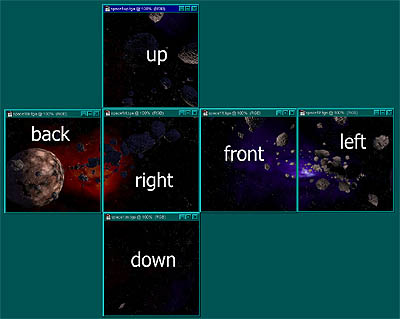
first thing you have to do is draw the art which is by far the hardest part. The environment map acts like a cube around your level so there must be 6 seperate pictures. up, down, left, right, front, back. They arent orientated the way you think they are though...below are some screenshots of some of the quake2 env. maps so you can see what sides must match the other sides.
unit5_ environment map
space1 environment map
each image must be 256x256 pixels
and there must be 2 seperate sets of images. This
is because there must be a set of 6 24 bit color tga files for
people with 3d acceleration cards and a set of 6 8 bit color
pcx files for people without. Remember though that the 8 bit
color pictures must be converted to the quake2 pallete.
The last thing you need to do is end all your image file names with: bk, dn, ft, lf, rt, and up. These stand for back, down, front, left, right, and up.
so if we made a new environment map called earth1 these are the image files we would have to have: earth1bk.tga, earth1dn.tga, earth1ft.tga, earth1lf.tga, earth1rt.tga, earth1up.tga, earth1bk.pcx, earth1dn.pcx, earth1ft.pcx, earth1lf.pcx, earth1rt.pcx, and earth1up.pcx. All of these images would be 256x256 pixels in size.
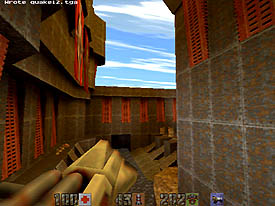
Once you have all your art done and you want to see what it looks like in a level then all you need to do is create a directory off of your /quake2/baseq2 dir called env. and put all the files in that directory. Then load up quake and start playing and type sky name of sky you made. So with earth1 we would type sky earth1. To actually get the sky to appear from the beginning you will need to add sky name of sky to your worldspawn entity. You can also make the sky rotate by adding a skyaxis and a skyrotate key and value into the worldspawn. Thats about all there is to creating your own environmental maps. The hardest part is the art but there are some programs that will make it easier. The one is called Bryce2 which is a 3d landscape creator. There is also a photoshop plugin at http://www.wasabisoft.com/ that lets you create cubic graphics that you might want to check out. You might also like to have a good graphic editing program. I prefer photoshop4. also remember that you will have to include your homemade environment map with any level you distribute if you want other people to be able to see it. here is my own bright sky env. map i made
Return
to Tutorials Page...
|