Func_plat
written by EutecTic
1. Introduction
to Quake 2 platforms
Platforms in Quake 2 work pretty much the same
as in Quake 1 with a few minor distinctions. Let's first take
a look at what is unchanged and clarify a few things at the
same time:
- Platforms
can only be made to go up. IOW, their normal idle
position is the lowered position unless they
are targeted (more on this later).
- Plats
must be drawn in the raised position in the map editor
so the lighting can be calculated properly by the compiling
utility (Qrad3).
- BUT,
a platform will initially be drawn in the lowered position
in the game unless it is targeted.
Now,
let's take a look at what has changed from Quake 1 to Quake 2
about platforms. Unfortunately, these differences are not really
an improvement. IMO, it's quite the opposite, here's why:
- In
Quake 1, when you wanted a plat to start in the raised position,
you simply set the "Plat Low Trigger" spawnflag (who
knows why they called it that?). Once the plat was touched
or triggered and brought down the first time, it would thereafter
function like a normal platform.
- In
Quake 2, if you want the platform to start in the raised position,
you have to target it with a trigger, independently
of the state of the "Plat Low Trigger" spawnflag. If you set
the spawnflag without targeting the plat, nothing will
happen and it will just behave as a normal plat. IOW,
the spawnflag is useless by itself. This is the first
setback compared to Quake 1.
- For
platforms in Quake 1, you had 2 choices of sounds or no sound
at all if you wanted them to be silent.
- In
Quake 2, platforms not only don't have any choice of
sounds, but you can't even make them silent either.
This is what I call "major setback No. 2" in platforms. Funny,
I somehow expected more from Quake 2 plats than Quake 1 plats,
not less!... Oh well...
2. Ok, how
do I make these work? Do I use height and lip?
There
are 2 basic ways to make and set platforms to operate exactly
the way you want (that is within their basic limitations):
The
first and most common way is to use the physical dimension of
the brushes that are part of the platform to set it's up-down
travel distance. In this particular case, the height
key pair is not used but the lip key pair is and
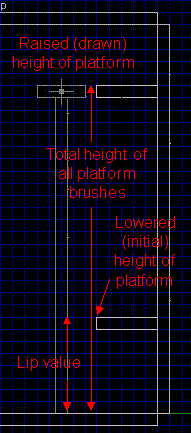
can be extremely useful. The basic setup formula in this case
is as follows:
(Total
platform height - lip value) = platform travel distance
Total
platform height:
This
is the overall height of all the brushes that are part
of the func_plat entity when measured from the lowest
point to the highest point. You're probably thinking:
hey! This definition is overkill. I could have figured that
out for myself long ago! All I have to do is add up all the
individual heights of all the brushes that are part of my plat
and I'm in business right?... Well, as long as none of
your brushes overlap heightwise. Otherwise, you'll have
to measure the distance from the highest to the lowest
point.
Lip
value:
The
height or amount by which your platform will be raised
from the floor when it's in the lowered position.

Figure
1: First method of evaluating platform travel
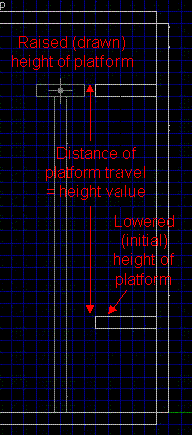
The second and easiest, most predictable way to
set your platforms is to use the height key pair. In this
case, the physical dimensions of the brushes that are part
of the platform have no importance and the lip key
pair has no effect and needs not be used. The basic setup
formula is as simple as it gets:
height
value = platform travel distance
I
bet you're saying: what?... that's it?... Yep! That's it! That's
all there is to it. Just make the platform and turn it
into a func_plat. Measure the distance between the
start and end position of the top of your
platform and transfer that value straight to the height
key pair and you're all set. It makes no difference what
size or shape the brushes of your platform are or
whether they overlap or not when using this method. The
only restriction is that the plat has to be drawn in the raised
position as always.

Figure
2: Second method of evaluating platform travel
So
in conclusion, both methods work fine. Choosing which one to
use at this point depends mainly on design particulars and personal
taste.
You
can also specify the speed,
acceleration and deceleration
of the platform. Speed, acceleration and decelaration are self
explanatory. If you want to have the platform triggered
then just give it a targetname and target it with a trigger.
I
have put an example of func_plat in the [example
.map]. So if you are having any problems then be sure to
check it out. Any other questions please post to the discussion
board.
Return
to Tutorials Page...
|